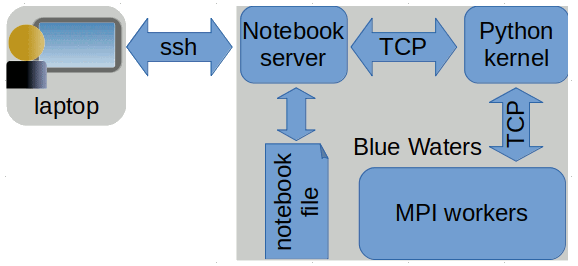
Python NotebooksJupyter notebooks on the login nodesJupyter can be used on the login nodes, however since the login nodes are shared among multiple users you must set up a unique password to access it, otherwise all users logged into the login node can access your notebook server. You may also want to consider running the jupyter instance inside of screen so that it survives if your ssh connection is dropped (for instructions on how to use screen please see here). To create a password you will have to create an appropriate jupyter_notebook_config.py file in $HOME/.jupyter/jupyter_notebook_config.py with content like this:
# find IP address of BW internal network interface
import socket
(name, aliases, ips) = socket.gethostbyname_ex(socket.gethostname())
for ip in ips:
  if(ip.startswith("10.")):
    internal_ip = ip
    break

# set up listener
from IPython.lib import passwd
c = get_config()
c.NotebookApp.password = passwd("$password$")
c.NotebookApp.open_browser = False
c.NotebookApp.ip = internal_ip
c.NotebookApp.port = 8888
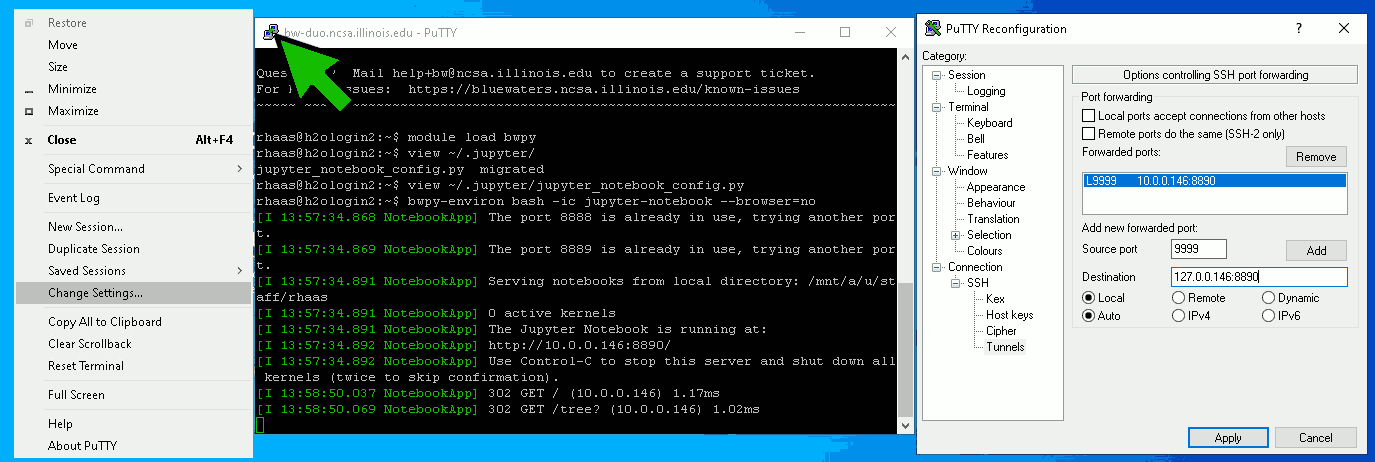
which instructs jupyter to start up a notebook server which attempts to listen for connections on port 8888 or a higher numbered one, accepts only connections from within the Blue Waters network (10.X.X.X) and requires the password $password$. You must change $password$ to a unique password of your own to prevent other users from logging into your jupyter session. The actual port used could differ if, e.g. another jupyter server is already listening on port 8888. You can then start jupyter as follows: module load bwpy bwpy-environ bash -ic jupyter-notebook --browser=no which will respond with something similar to: The Jupyter Notebook is running at: http://10.0.0.148:8912/ Once jupyter has started you will need to create a port forwarding from your laptop to the IP address and port that jupyter listens to. In the example above this is IP address 10.0.0.148 port 8912. In a nutshell you have to create a new connection to Blue Waters and forward a port from the local laptop to the IP address and port listed by jupyter. Using the IP address and port in the example, you would use: ssh -L 127.0.0.1:35509:10.0.0.148:8912 username@h2ologin-duo.ncsa.illinois.edu to forward port 35509 on your laptop to port 8912 on the IP address that jupyter is listening to. Depeding on your ssh client port forwarding may be set up differently, e.g. using these settings for PuTTY (Windows). After this you can connect to the jupyter notebook server by pointing your browser at http://127.0.0.1:35509 on your laptop (note the "http://" transport prefix) and entering the password in TroubleshootingIf you are unable to connect, please check the following:
NOTE: There is currently (as of 2019-02-28) an issue with jupyter-notebook that prevents it from properly shutting down when CTRL-C is pressed unless the Jupyter notebooks on compute nodesRunning jupyter notebooks on compute nodes is similar to running on login nodes and you must first create a jupyter_notebook_config.py file as described above. Once you have a working setup on the login node, a simple example qsub script on a compute node, using Blue Waters's cluster compatibility mode (CCM) to provide a traditional cluster environment for jupyter, would look like:
#!/bin/bash
#PBS -l nodes=1:xe:ppn=32
#PBS -l walltime=24:0:0
which will start the jupyter server on the compute node belonging to the job. Output from the running job is collected in JOBID.bw.OU which will thus contain a line like this: The Jupyter Notebook is running at: http://10.128.94.181:8888/ Since you are alone on the compute node the port will always be the one you asked for i.e., 8888. Once jupyter has started you will need to create a port forwarding from your laptop to port 8888 on the compute node. In the example given above you need to execute on your laptop: ssh -L 127.0.0.1:35509:10.128.94.181:8888 username@h2ologin-duo.ncsa.illinois.edu to use h2ologin-duo.ncsa.illinois.edu to forward port 35509 on your laptop to port 8888 on the compute node. After this you can connect to the jupyter notebook server by pointing your browser at http://127.0.0.1:35509 on your laptop and entering the password in jupyter_notebook_config.py. Jupyter notebooks using MPITo use multiple compute nodes in Jupyter, use
MPI workers are launched using the jupyter serverextension enable --py ipyparallel jupyter nbextension install --user --py ipyparallel jupyter nbextension enable --py ipyparallel ipython profile create --parallel --profile=pbs which installs the notebook extensions in To properly initialize MPI add c.MPI.use = 'mpi4py' to
# find IP address of BW internal network interface
import socket
(name, aliases, ips) = socket.gethostbyname_ex(socket.gethostname())
for ip in ips:
    if(ip.startswith("10.")):
        internal_ip = ip
        break
c.HubFactory.ip = internal_ip
c.BatchSystemLauncher. queue = 'debug'

c.IPClusterEngines.engine_launcher_class =  'PBSEngineSetLauncher'
c.PBSEngineSetLauncher.batch_template = """#!/bin/bash
#PBS -q {queue}
#PBS -l walltime=00:30:00
#PBS -l nodes={n//4}:ppn=32:xe
module load bwpy bwpy-mpi
OMP_NUM_THREADS=8
aprun -n{n} -d$OMP_NUM_THREADS  bwpy-environ -- ipengine  --profile-dir={profile_dir}
"""
to Start the engines using bwpy-environ ipcluster start --n=4 --profile=pbs and wait for the submitted job to begin running. Once the jobs has started running, connect to the workers by entering import ipyparallel as ipp ranks = ipp.Client(profile='pbs') ranks.ids into a jupyter notebook whose python kernel can access your Note: Using ipyparallel there are two sets of python processes involved: the ipython kernel started by jupyter notebook and the MPI workers. Cells marked by the
ExamplesThis example shows how to use MPI functions and how to modify variables in the workers:
In  [1]: import ipyparalle as ipp
In  [2]: ranks = ipp.Client(profile='pbs')
         ranks.ids
Out [2]: [0, 1, 2, 3]
In  [3]: %%px
         from mpi4py import MPI
         rank = MPI.COMM_WORLD.Get_rank()
         print (MPI.Get_processor_name(), rank)
         [stdout:0] nid26658 0
         [stdout:1] nid26658 1
         [stdout:2] nid26658 2
         [stdout:3] nid26658 3
In  [5]: %%px
         print (rank)
         [stdout:0] 0
         [stdout:1] 1
         [stdout:2] 2
         [stdout:3] 3
In  [6]: ranks[2]['rank']
Out [6]: 2
In  [7]: ranks[2]['rank'] = 42
In  [8]: %%px
         print (rank)
         [stdout:0] 0
         [stdout:1] 1
         [stdout:2] 42
         [stdout:3] 3
The next example demonstrates how to use matplotlib in the workers. There is a sublety in that one must save matplotlib's plot output in a variable and pull that variable to display it in the notebook. The requires the use of the
In [1]: %%px
        import numpy as np, numpy.random as rd
        x = np.arange(10)
        y = rd.rand(len(x))
        import matplotlib as mpl
        mpl.use('agg')
        import matplotlib.pyplot as plt
        if MPI.COMM_WORLD.Get_rank() == 3:
            p = plt.plot(x, y)
IN [2]: %matplotlib notebook
        ranks[3]['p'];
This last example uses yt to produce a volume rendering of gas in a galaxy using MPI to speed up rendering. It follows yt's parallel rendering example.
In [1]: %%bash
        wget http://yt-project.org/data/IsolatedGalaxy.tar.gz
        tar -xzf IsolatedGalaxy.tar.gz
In [2]: %%px
        import yt
        yt.enable_parallelism()

        ds = yt.load("IsolatedGalaxy/galaxy0030/galaxy0030")
        sc = yt.create_scene(ds)
        sc.camera.set_width(ds.quan(20, 'kpc'))
        source = sc.sources['source_00']
        tf =  yt.ColorTransferFunction((-28, -24))
        tf.add_layers(4, w=0.01)
        source.set_transfer_function(tf)

        sc.render()

        if yt.is_root():
            sc.show()
|
Skip to Content


Blue Waters User Portal
Sign In


Blue Waters is supported by the National Science Foundation (awards OCI-0725070 and ACI-1238993) the State of Illinois, and the National Geospatial-Intelligence Agency.
Contact Blue Waters Team with questions regarding this page.
Copyright 2024 Board of Trustees of the University of Illinois. All rights reserved. Web privacy notice.