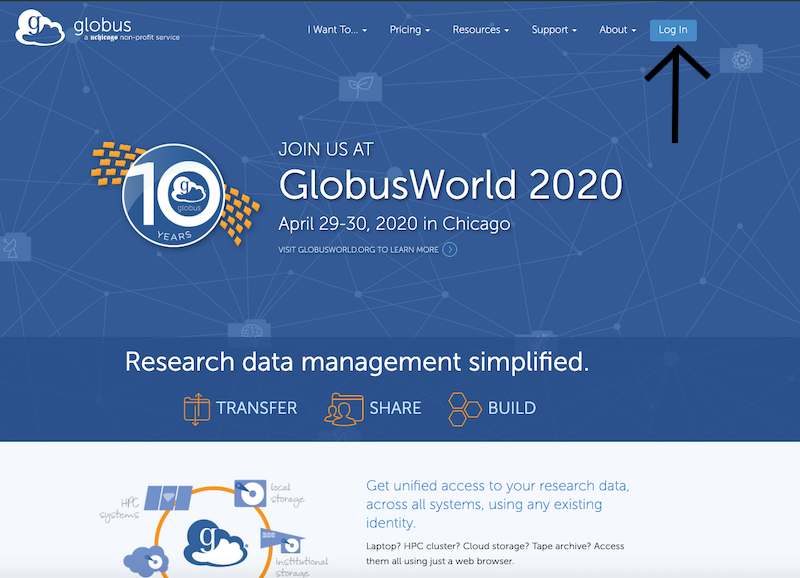
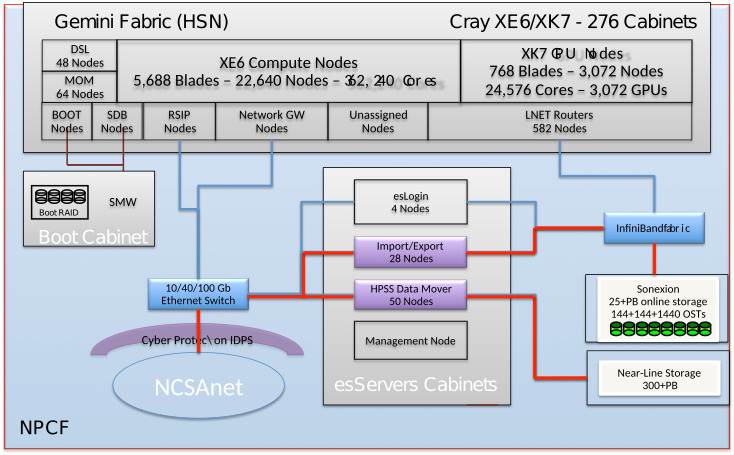
Data TransferGlobus Online (GO) is the supported, preferred method of moving files or groups of files of any significant size around the Blue Waters system or between Blue Waters and other facilties. Basically, if it's not an operation that can be completed by the 'cp' command in a few minutes, use Globus Online for the transfer. GO has parallel access to dedicated data movement hardware and can typically move files much more quickly than is possible with commands on the logins. Particularly, do NOT do large transfers with programs like scp, sftp, or rsync. They consume shared file resources on the logins and cause other user interactive shells to slow down. There are specific limits for how long single processes can be run on the Blue Waters login nodes, and programs violating those limits will be killed automatically. Globus OnlineDescriptionGlobus Online is a hosted service that automates the tasks associated with moving files between sites. Users queue file transfers which are then done asynchronously in the background. Globus Online transfers files between "endpoints" which are systems that are registered with the GO service. Blue Waters provides an endpoint to its filesystems: ncsa#BlueWaters. These are backended by multiple Import/Export nodes optimized for performance with Globus Online. If you need to transfer files to or from a system that isn't yet registered as an endpoint (like your desktop or laptop), you register that system using Globus Connect Personal. How to use Globus OnlineSign in to the Globus Data Movement portal to transfer data between sites by using the web interface. To get there, go to the Blue Waters portal (bluewaters.ncsa.illinois.edu), mouse over the "Using Blue Waters" tab and click on the "Data" button to go to the Data Transfer page. The "Globus Online" button on the top of that page takes you to the Globus Online user interface: If you don't have a Globus Online account, see our page about how to create one.
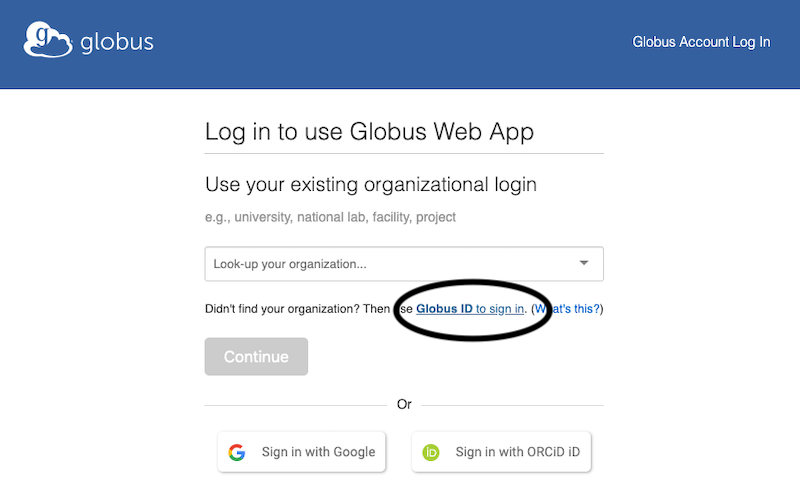
Once on the Globus GUI login screen, DO NOT click the “Continue” button or “look up your organization”. Instead click “Globus ID to sign in” right above the Continue button.
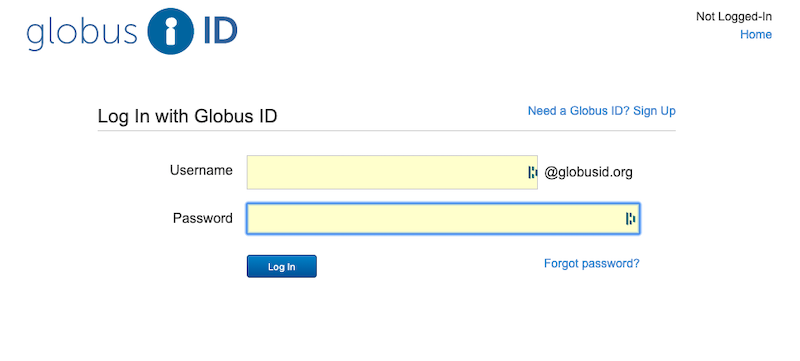
You will go to a screen to log in with your Globus ID username and password, which is completely disconnected from your NCSA or Blue Waters accounts, and we cannot reset it for you. If you don’t remember your password, use the “Forgot Password?” Link to reset your globus password. If you don’t have a globus account (and you might not, even if you’ve been using Globus), then clock in the “Need a Globus ID? Sign Up” link in the upper right.
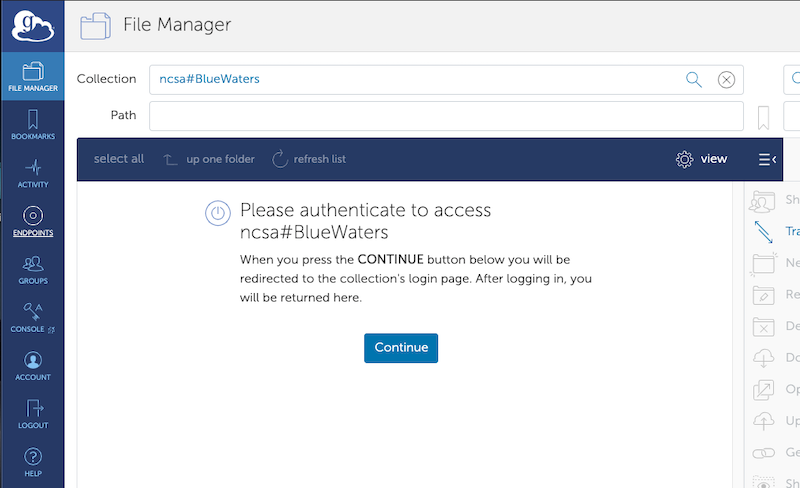
Once you've logged into Globus itself, you will see the “file transfer” window. It changed in mid-2019 and is substantially different than the old Globus file transfer page. If you happen to start on the one-panel screen, then just click the two-panel icon on the upper right to go to the two-panel transfer screen. Globus endpoints work similarly to the way they used to, but they’ve been renamed “collections”. To open an endpoint, click on the “search” box next to the word “collections” on the appropriate panel. You can then search for Globus endpoints by name. The Globus endpoint for Blue Waters that you can access is ncsa#BlueWaters. Globus should then ask you to authenticate for this endpoint. Please click the “continue” button to do so.
 If, having selected the ncsa#BlueWaters endpoint, the file transfer screen instead shows this error, If, having selected the ncsa#BlueWaters endpoint, the file transfer screen instead shows this error,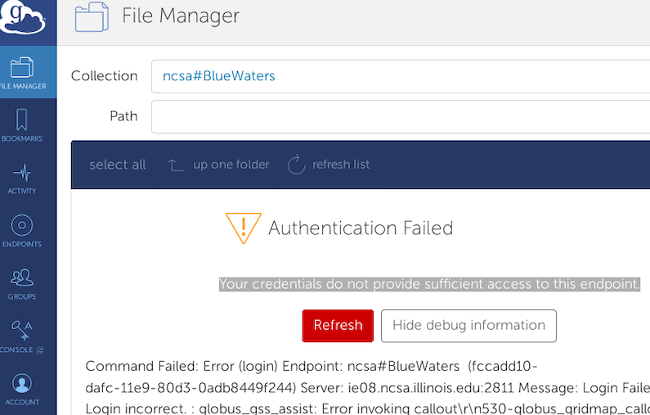 Go to the left side and click on “endpoints”. On the line that lists the endpoint that you’re having trouble with, click on the “>” all the way on the right side of the page to bring you to the endpoint details page. On the endpoint details page, click on the “De-activate Credentials” button on the right side of the screen, then when the creditials are de-activated, click on "Activate Credentials" to begin the endpoint authentication process as follows.
You may also have to log out of all CILogin using https://cilogon.org/logout/ . Occasionally using an "incognito" or "private" browser window can also help to avoid sending (old) login cookies.
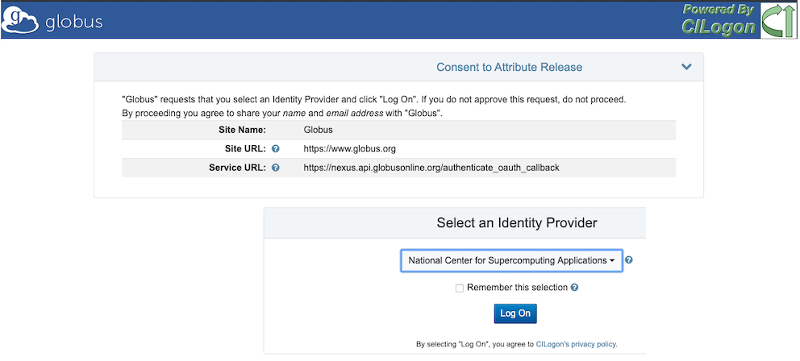
You will then go to a “CILogon” screen with Globus Branding. Here, select the Identity Provider “National Center for Supercomputing Applications” in the pulldown menu, then click “Log On”.
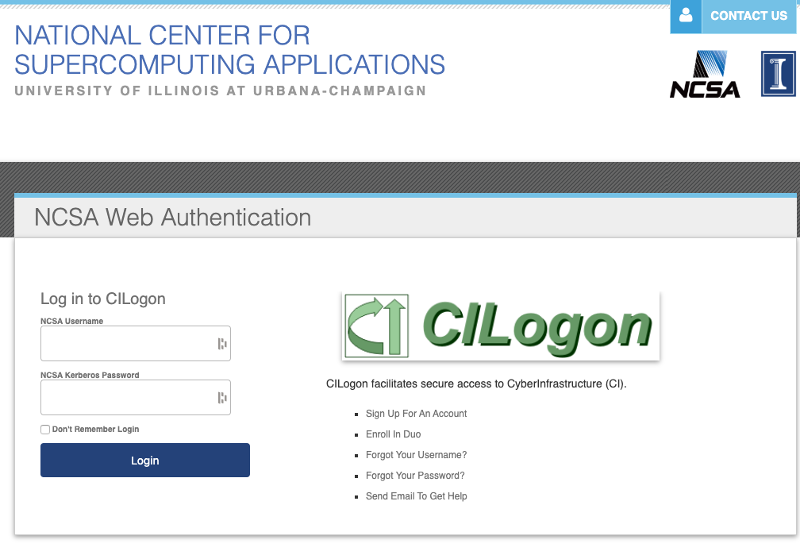
You will then go back to an NCSA authorization page. Type in your Blue Waters username at “NCSA Username”, and your kerberos password at the “NCSA Kerberos Password”.
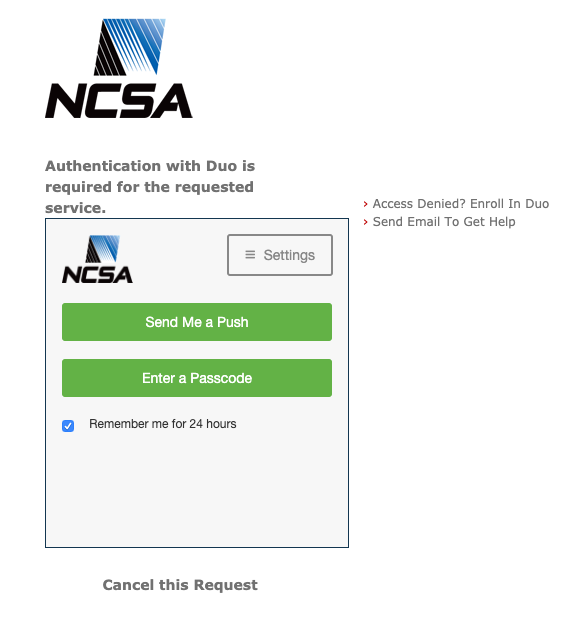
If you don’t remember what your kerberos password is (or if you don’t know what that even means) then below the CILogon log, click the “Forgot your Password?” link. That should take you to a set of menus that allow you to set up a static kerberos password that will be part of your login credentials. Use a strong password that you don’t use for anything else, etc etc. When you've typed in your kerberos password, it will ask you for Duo authentication. (If you somehow made it this far without being a member of NCSA Duo, then enroll in that using the link at the upper right.)
Assuming your NCSA Duo is up to date, then click on “send me a push” or “enter bypass code” to authenticate. Then you should be back at the file transfer screen with your home directory open, which will allow you to transfer files between Globus Online endpoints. If you need to transfer files from a system that isn't yet a GO endpoint, you set it up to be one with the Globus Connect Personal software:
Please only initiate transfers within Globus Online sourcing from files that have been written to disk and closed by the application. If GO is trying to transfer a file from Lustre that is being written to by a user application, then it gets confused about where it is in the file and tries to transfer the file multiple times. This uses up a lot of extra resources and doesn't gain anything for the user. It's faster to transfer files once they're done being written. Lustre StripingIncoming files now inherit the stripe count, stripe size, and stripe offset settings of the directory in which they are placed by GO. The stripe count for a particular file will be revised higher, if necessary, for very large files. Command Line Interface (CLI)Using Globus CLI included in bwpyStarting with version 2.0.2 bwpy contains globus python module, and no further install is required: module load bwpy/2.0.2 globus login Self-deployment of Python-based Globus CLITo self-deploy the Python-based Globus CLI, follow these steps: module load bwpy # or module load bwpy/2.0.2 virtualenv "$HOME/.globus-cli-virtualenv" source "$HOME/.globus-cli-virtualenv/bin/activate" pip install globus-cli globus login To check version of globus installed:> globus version Installed Version: 1.13.0 Latest Version: 1.13.0 If you do not see 1.13 or more recent then remove the .globus-cli-virtualenv directory located in your $HOME directory. You are now logged into Globus and can intiate queries and transfers. For example find the Blue Waters endpoint:> globus endpoint search BlueWaters ID | Owner | Display Name ------------------------------------ | --------------------- | ----------------------- d59900ef-6d04-11e5-ba46-22000b92c6ec | ncsa@globusid.org | ncsa#BlueWaters c518feba-2220-11e8-b763-0ac6873fc732 | ncsa@globusid.org | ncsa#BlueWatersAWS You can then activate an endpoint and list content: > globus endpoint activate d59900ef-6d04-11e5-ba46-22000b92c6ec The endpoint could not be auto-activated. This endpoint supports the following activation methods: web, oauth, delegate proxy For web activation use: 'globus endpoint activate --web d59900ef-6d04-11e5-ba46-22000b92c6ec' > globus endpoint activate --web d59900ef-6d04-11e5-ba46-22000b92c6ec Web activation url: https://www.globus.org/app/endpoints/d59900ef-6d04-11e5-ba46-22000b92c6ec/activate Cut-n-paste the URL into a browser and authenticate against NCSA's multi-factor authentication. Now you can list the endpoint.
>  globus ls -l d59900ef-6d04-11e5-ba46-22000b92c6ec:${HOME}
Permissions | User   | Group     | Size       | Last Modified             | File Type | Filename
----------- | ------ | --------- | ---------- | ------------------------- | --------- | -------------
0755        | gbauer | bw_staff  |       4096 | 2018-03-14 23:20:16+00:00 | dir       | 5483992/
0755        | gbauer | bw_staff  |       4096 | 2018-03-15 04:42:23+00:00 | dir       | 5722562/
0755        | gbauer | bw_staff  |       4096 | 2018-03-15 03:45:23+00:00 | dir       | 6210934/
0755        | gbauer | bw_staff  |       4096 | 2012-06-06 01:16:33+00:00 | dir       | XYZ/
0755        | gbauer | bw_staff  |       4096 | 2016-11-18 19:06:53+00:00 | dir       | 123/

Please see https://docs.globus.org/cli/ for more commands and examples.
More on CLIMoving Files Files can be moved on Nearline using the Pattern Matching This is an example script demonstrating a method to transfer only files of a given pattern. NOTE, for N files, the script would generate N transfers.
Estimating the size of a directory ("du") You can use a recursive directory listing from
globus ls --long --recursive "fccadd10-dafc-11e9-80d3-0adb8449f244c:~" \
   | awk '$12=="file"{sum+=$7} END{print sum/1e9" GB"}'
Important CLI Notes
globus --help
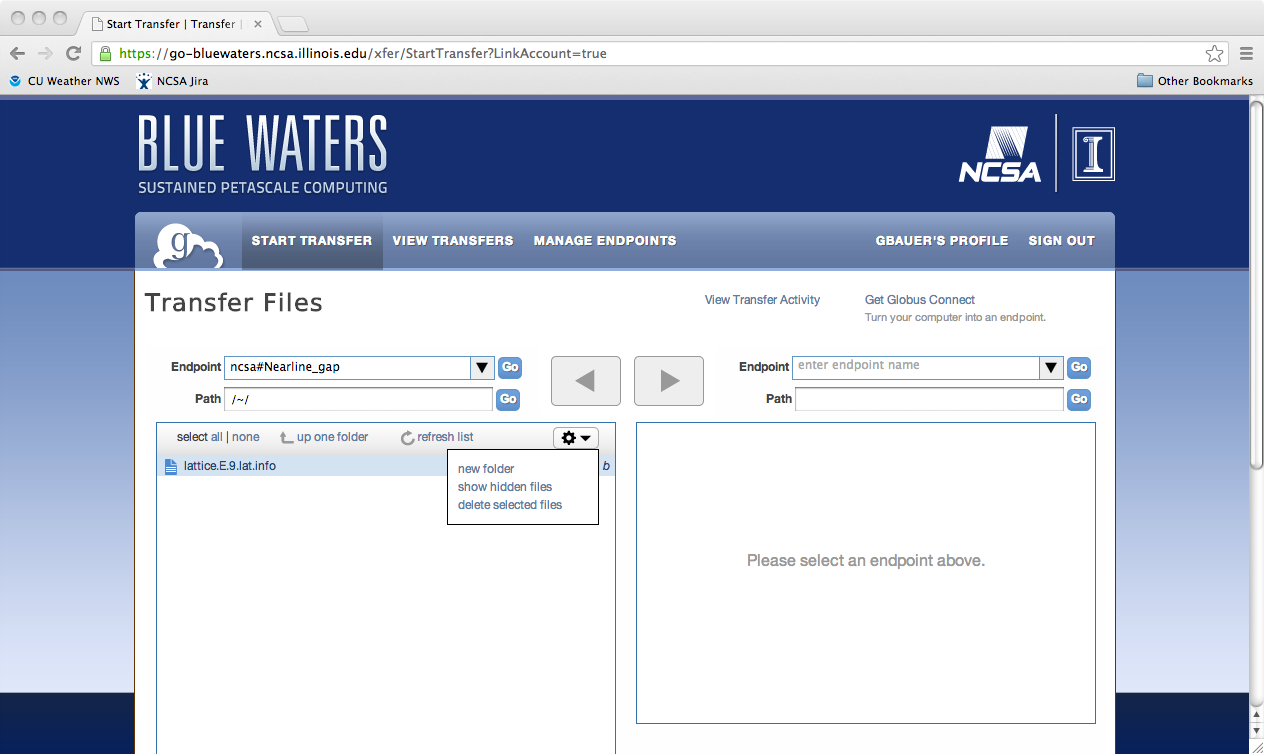
Python scriptingGlobus provides access to the REST API behind Globus-Online via the globus-python-sdk which allows more complex scripts than what is possible using the CLI wrapper. Blue Waters offers a convenience wrapper around this Python package which is described on the globus-python-sdk portal page. Deleting a File, Folder, or DirectoryTo delete files using Globus Online from a endpoint, you first need to login into Globus Online and select the enpoint you wish to delete from, by first following the proceedure for transfereing a file. Next, you need to select the object to delete, click on the action "wheel" triangle and select "delete selected files".
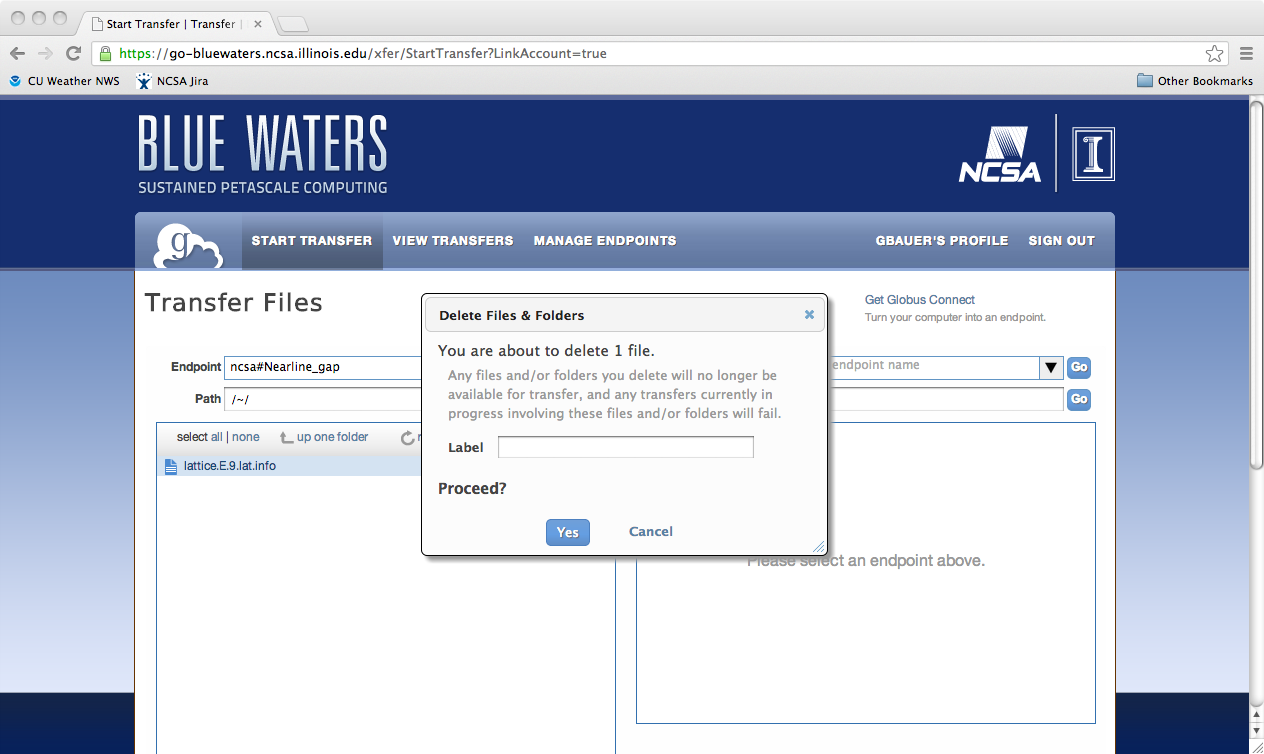
You will then be asked to confirm the process and provide a label for future reference (optional). Click on "Yes" when ready.
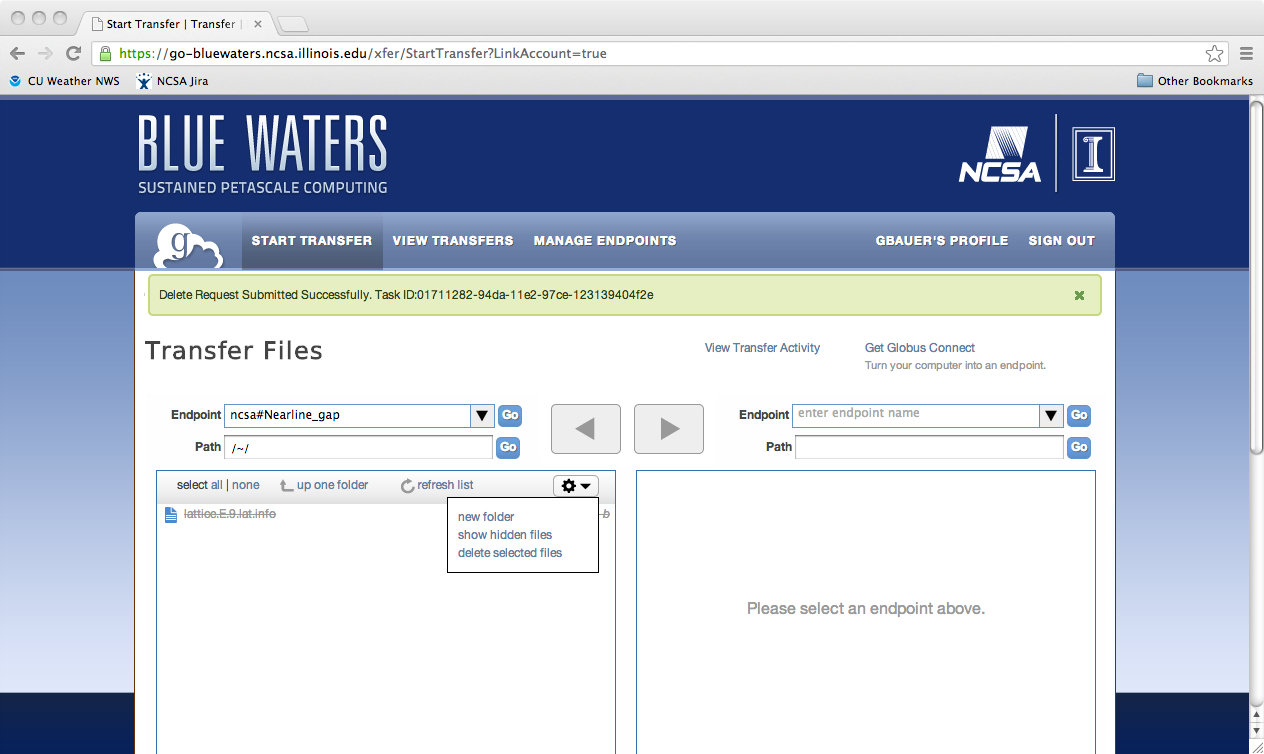
The object to be deleted will then get set with a line across it as is shown in the next image.
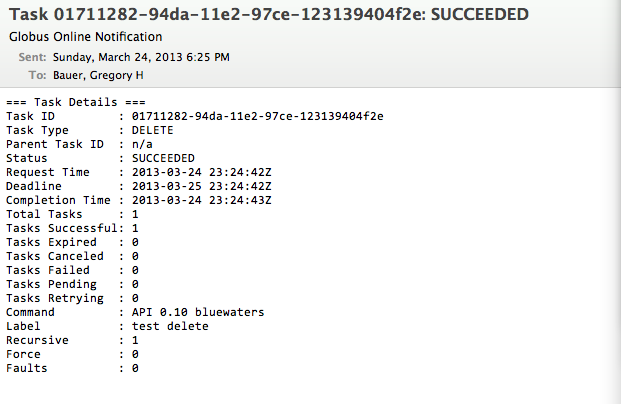
If you have the option set to receive an email for every transaction you should see the following notice appear in your email once the action is completed.
File Aggregation for transferBlue Waters' Nealine system will not able to retrieve hundreds of files from the storage tapes as the files will have been scattered over many tapes, each of which needs to be rewound to the correct location for every single file. Instead you must aggregate tiny files into chunks of approximately 10s of GBs in size.
First create a list of directories with files to archive: h2ologin$ cat >files-to-archive.txt <<EOF simulation1 simulation2 input-data code EOF then obtain an interactive session using a single node (these instructions will not utilize multiple nodes) and run tar h2ologin$ qsub -I -l nodes=1:xe:ppn=32 -l walltime=2:0:0 mom1$ cat files-to-archive.txt | aprun -n 1 -d 32 xargs -P 32 -d '\n' -I fname tar -czf fname.tar.gz fname which will use up to 32 cores on a compute node to create up to 32 tar files in parallel producing tar files simulation1.tar.gz simulation2.tar.gz etc. If there are sufficiently many directories that more than a single node's worth of directories will be archived you may want to look at the instructions on job bundling to use multiple nodes. Similarly you can use the same list of files to extract the resultant tar files in parallel h2ologin$ qsub -I -l nodes=1:xe:ppn=32 -l walltime=2:0:0 mom1$ cat files-to-archive.txt | aprun -n 1 -d 32 xargs -P 32 -d '\n' -I fname tar -xzf fname.tar.gz Data Compression and transfer discussionThere are a variety of factors to consider when deciding whether or not to compress data. For data that compress at high ratios (ascii text, highly structured binary data ) the space savings alone may warrant compression. In other cases, it may help to do some analysis before moving a large amount of data in order to accomplish the move in the least time. To help with your decision, it's useful to take a few measurements. The examples and model below were developed with gzip for compression (other utilities like zip, bzip, compress are available on many unix systems) and globus-online for the transfer mechanism. See the detail log for specifics. 1) The bandwidth between your site and NCSA may be determined by a tool like perfsonar. For many Xsede resource providers, a table is available at: http://psarch.psc.xsede.org/maddash-webui/ . Alternatively, you may run your own bandwidth test to our endpoint from a browser by loading: http://ps.ncsa.xsede.org , or you may use one of the well known bandwidth testing applications available online to get your baseline bandwidth to the internet. We'll call this bandwidth : xfer_bandwidth (MB/s unless otherwise indicated). 2) When compressing your data, make a note of how long it takes (use the time command on a unix system). You may then calculate the compression bandwidth as : (raw_size / compression_time). We'll name the compression bandwidth : compression_bandwidth=(raw_size/compression_time). It may be useful to compress a smaller representative file to get this number if the workflow will be moving extremely large files. 3) The compression ratio for your data will be the size of the raw data divided by the size of the compressed data (this should be a number >= 1 ). This variable will be : compression_ratio=(raw_size/compressed_size). With the measurments above, we can develop a simple procedure to help us determine when compression will save time with respect to data transfers. The goal is to compare these 2 expressions:
With compression, the effective bandwidth is amplified and becomes compression_ratio*xfer_bandwidth and the second term represents time spent compressing data. The smaller quantity in seconds will move your data in the least time. You may still opt to compress if saving space is the overriding concern. Here we look at a couple of example scenarios: Scenario 1: gigabit ethernet enabled laptop moving a 1 gigabyte file to Blue Waters 1015MB / (112MB/s) vs. 1015MB / [(1015MB/775MB )*112MB/s] + 1015MB / [1015MB/118 s] 9s vs. ( 7 + 118 )s Rule of thumb: With high bandwidth end-to-end networking (gigabit ethernet and better), compression will add time to your transfers. Until compression algorithms can run at much higher bandwidths, this will continue to hold. Scenario 2: wifi enabled laptop moving an approx. 1 gigabyte file to Blue Waters 1015MB / (3.75MB/s) vs. 1015MB / [(1015MB/775MB )*3.75MB/s] + 1015MB / [1015MB/118 s] 270s vs. ( 206 + 118 )s Rule of thumb: With end-to-end bandwidth near 100baseT speeds of 100Mbit/s, compression is more of a toss-up with respect to overall transfer speed. Other factors may come into play like the consistency of the xfer_bandwidth. The compression_ratio becomes more important and may be the dominant factor. Scenario 3: broadband cable connection working from home and transfer of small source code directory tree 6.8MB / (0.11MB/s) vs. 6.8MB / [(6.8MB/2.4MB])*.11MB/s] + 6.8MB / [6.8MB/0.5s ] 62s vs (22 + 0.5 )s Rule of thumb: With low bandwidth links (home broadband, hotel lobby...) , the compression_bandwidth is typically higher than the xfer_bandwidth and compressing saves both time and space: win-win. This is changing as commodity networks are upgaded, and watch out for asymmetric bandwidths. On the test setup for this scenario, the download bandwidth was 3x the upload bandwidth so compression may save time in one direction and cost time in the other. The simplified model and discussion ignores a few factors:
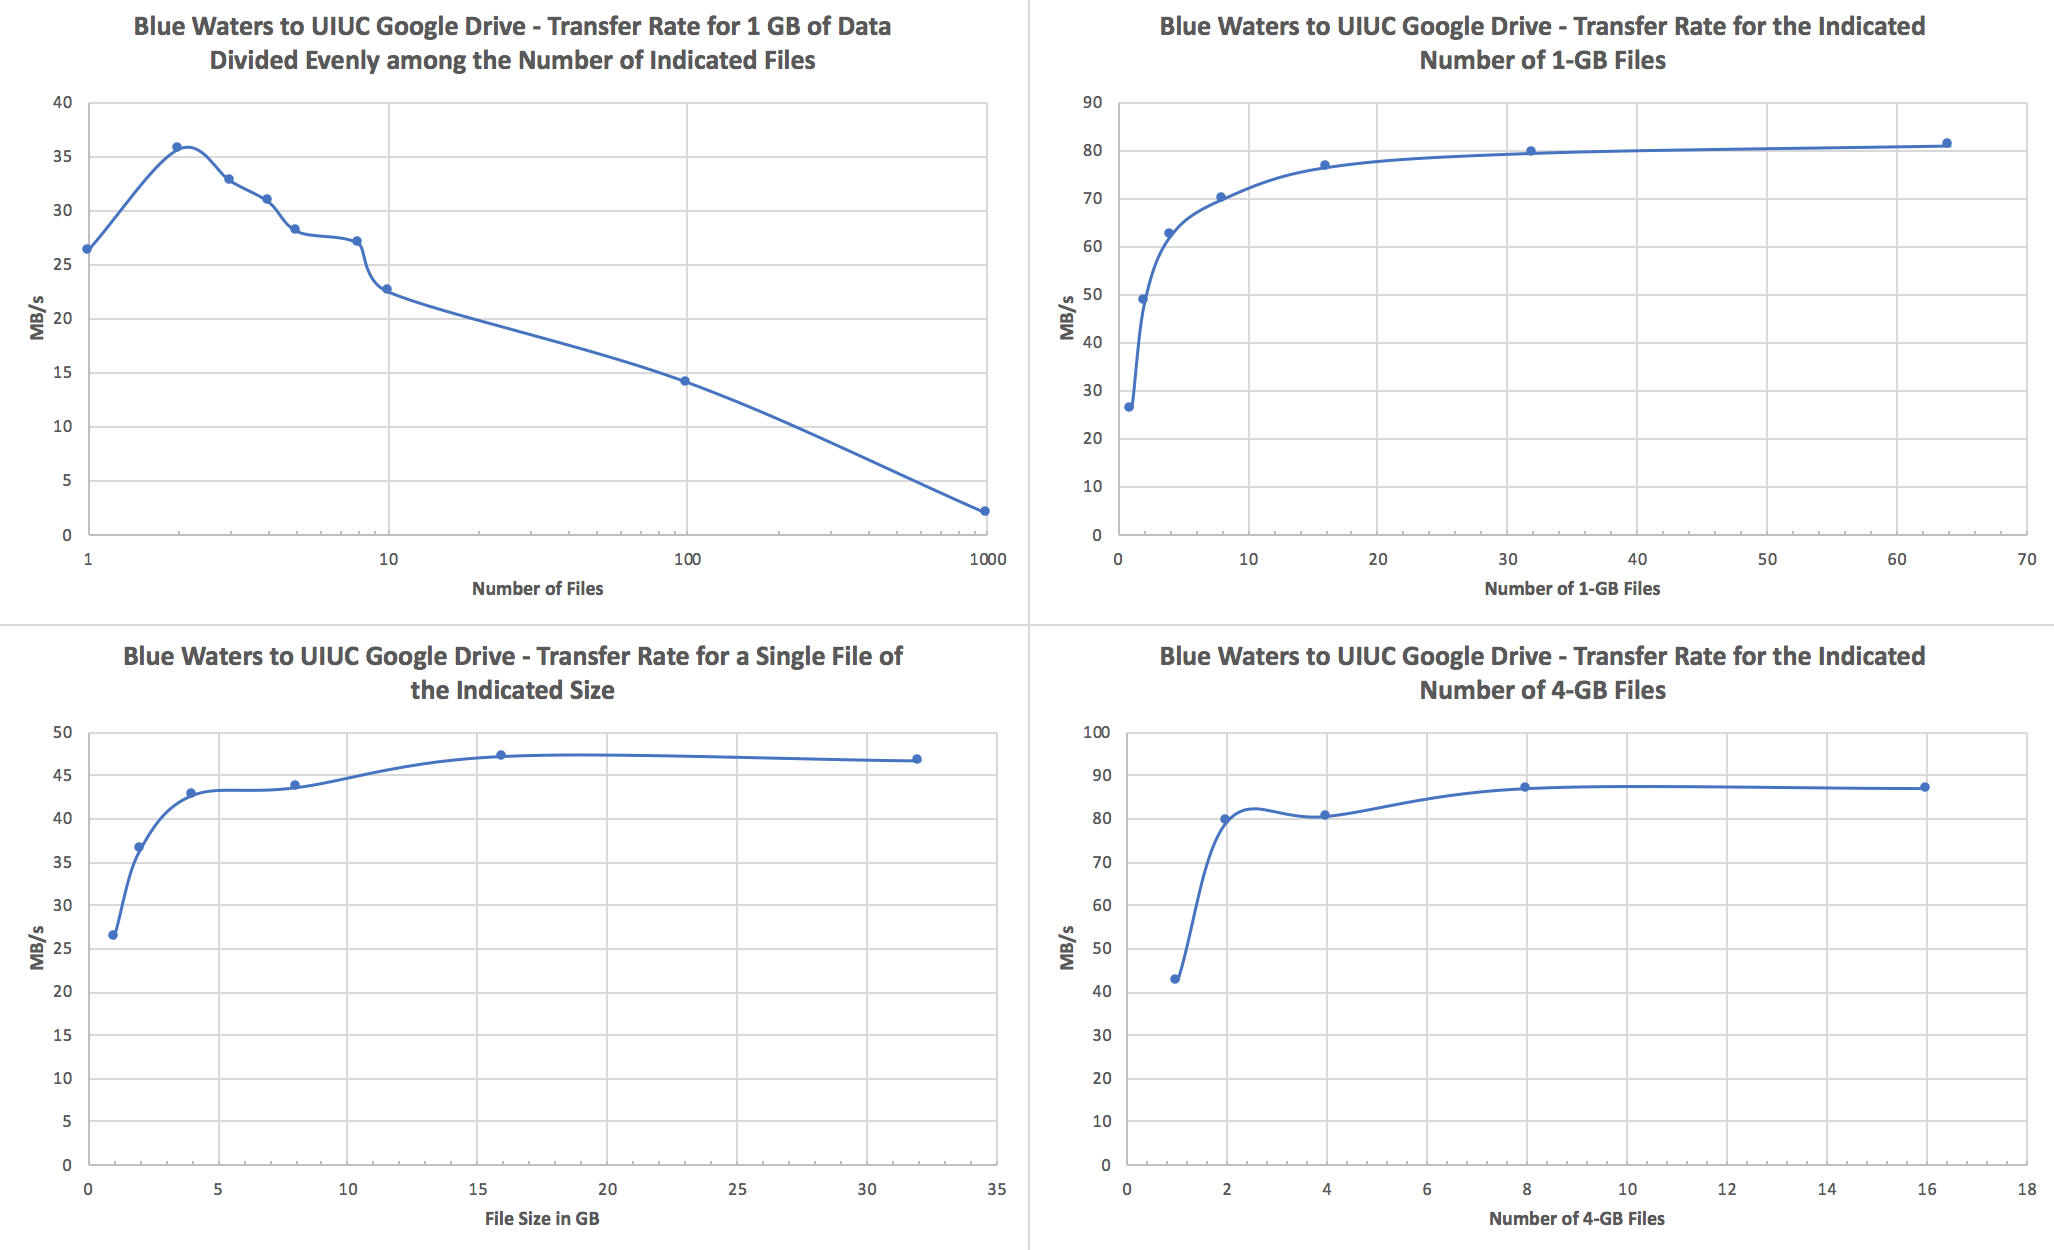
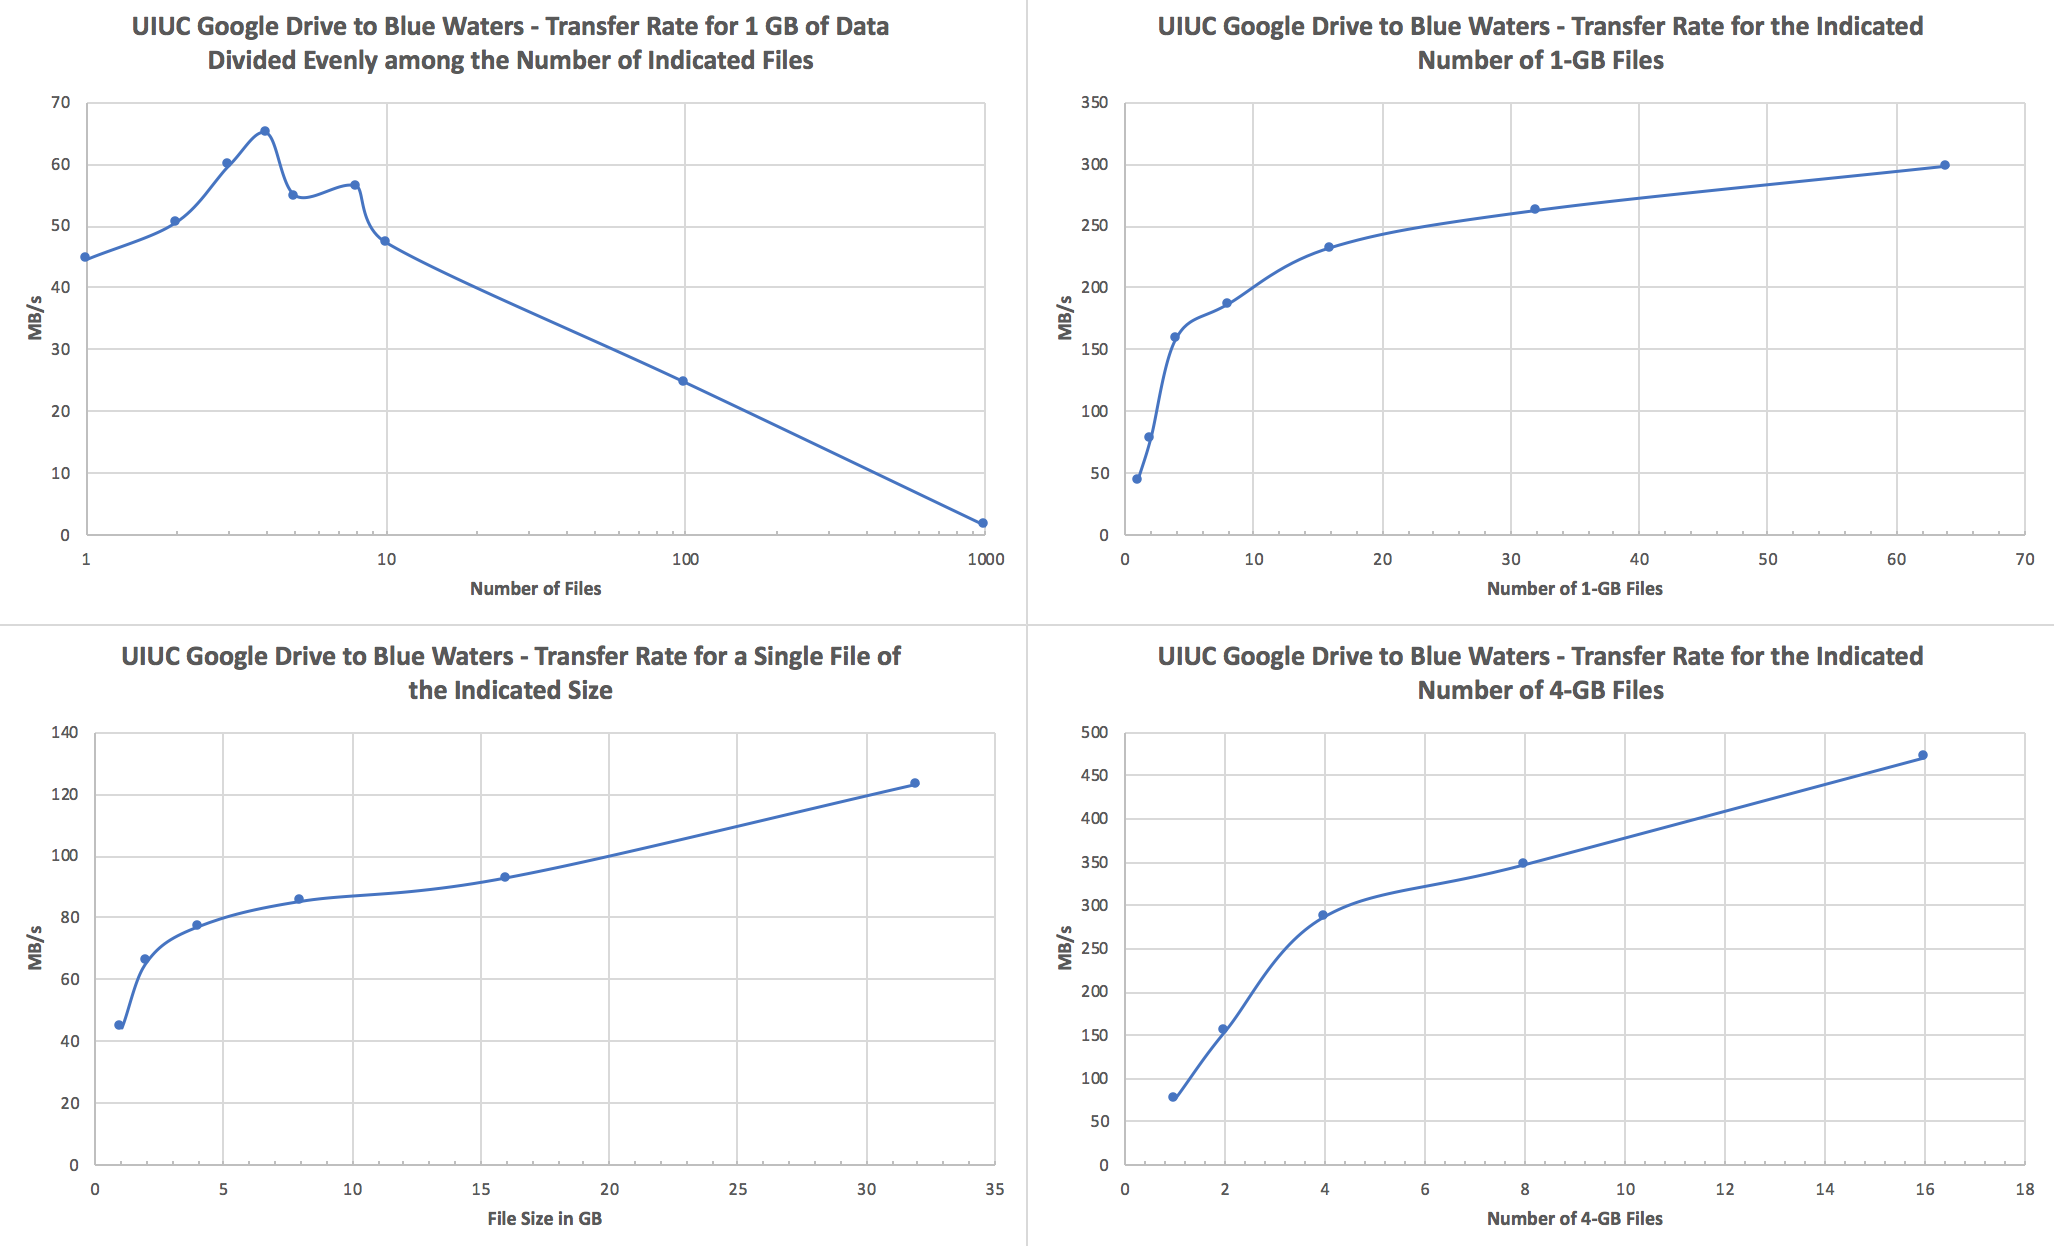
Performance ConsiderationsWe recommend users to transfer fewer but larger files. If a transfer attempts to move tens to hundreds of thousands of small (<1GB) files, performance will suffer due to file staging overhead. In such cases, It is best to use tar to form larger files of size tens or hundreds GB before starting a GO transfer. Globus Transfers to AWS S3To create a Globus AWS S3 collection using the NCSA Globus AWS gateway please see Create AWS S3 Collection on NCSA AWS S3 endpoint/gateway on the NCSA wiki. For questions about the AWS S3 connector please email help+globus@ncsa.illinois.edu . Globus Transfers to Google DriveGoogle G Suite for Education's Google Drive is recommended by Google for storage of teaching and research related documents and records. Currently Google imposes a limit of approximately 750 GB per day upload. The maximum size per single file is 5 TB, and the upload limit is only enforced on new transfers, so it is possible to upload, e.g., four 4 TB files simultaneously. As long as the Blue Waters file system from which you're transferring files isn't heavily loaded, upload speeds of 80-90 MB/s can be achieved when transferring multiple large files, and download speeds for the same can be in excess of a few hundred MB/s. See the end of this section for a discussion of how to optimize your transfers. For storing and sharing large research Google recommends using their fee based Google Cloud storage. Globus offers a Google Cloud connector that is not currently licensed by NCSA. Please let us know with a ticket to help+globus@ncsa.illinois.edu if you plan to use your Google Cloud connector. Users with Google accounts in domains other than illinois.edu must email help+globus@ncsa.illinois.edu to request access. Please email help+globus@ncsa.illinois.edu for Google Drive connector questions. To create a Google Drive connector endpoint please see the UPDATED NCSA wiki page Accessing the NCSA Google Drive @Illinois with Globus for step by step instructions. For smaller data sets that are less than a couple hundred GB or so, tar data into files that are at least 1 GB in size; 4+ GB per file would be best.We strongly recommend that you use tar to bundle up smaller files and directories into a single or a few large files and transfer those to Google Drive via Globus Online. Here are a couple specific recommendations:
Here are some notes and test results that inform those recommendations: Notes:
Upload (Blue Waters to UIUC Google Drive):
Download (UIUC Google Drive to Blue Waters):
Note that 1 GB is 1.0e9 bytes for all of these tests.
Additional Information / References
AWS CLI via Boto3If you are interested in using the AWS CLI to transfer files between Blue Waters and AWS S3 buckets using the Boto3 python package, see this portal page: Using AWS (Amazon Web Services) S3 CLI with Boto3 Python Package. Note that this does not invovle Globus and will require access to the Hydro cluster. |
Skip to Content


Blue Waters User Portal
Sign In

Blue Waters is supported by the National Science Foundation (awards OCI-0725070 and ACI-1238993) the State of Illinois, and the National Geospatial-Intelligence Agency.
Contact Blue Waters Team with questions regarding this page.
Copyright 2024 Board of Trustees of the University of Illinois. All rights reserved. Web privacy notice.